Well, OK, it´s not technically my first one, having done big catering events for music festivals and all but it was the first catering event I ran on my own, designed the menu, etc. I loved the adrenaline and, most importantly, how smoothly it all went.
I had initially decided on a starter of figs wrapped in prosciutto with a blue cheese filling as I thought that was easy enough and, most importantly, could be done in advance. All very nice in theory… except it isn’t the season for figs here in Argentina. So, I went for plan B. The hostess had suggested Cantaloupe melon wrapped in prosciutto but I thought that would be baby stuff to do and not really challenging so I suggested a scallop starter. Boy! Was that a wonder! And it looked just beautiful (and very elegant) on the plate. Unfortunately, due to the speed I was cooking with (and the hungry guests that were waiting) I couldn´t immortalise it for posterity… which means I may have to do this dish again… Oh, well…
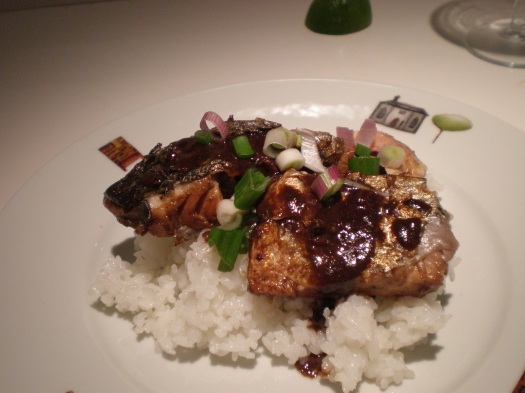
For the main dish, I adapted a wonderful Nigella recipe for Teriyaki salmon I found here, mainly in that I used my well-tested Teriyaki sauce for marinating the salmon and I also marinated the salmon for longer. Let me tell you, if you leave it overnight, like an ordinary marinade, it will turn into this glossy, thick, caramel you won´t believe you´re eating. They were four children having dinner that night and they all ended up licking their fingers. It is also a breeze to cook for an event if you have the sushi rice prepared (and covered with tinfoil) beforehand. I had a few unexpected situations, such as being presented with this wonderful (whole) salmon which I had to manually pin-bone with a pair of stolen tweezers but if you ask your fishmonger to do it for you before you take it home, it should be easy peasy, reallly.
For dessert, I chose a classic, crème brûlée, for two reasons: it is both very elegant to serve and it is very easy to make AND have it prepared beforehand in the fridge. You can even do it the night before. This is the dish I was the least concerned about and the first one I made. Once dessert was out of the way, I could concentrate on my fish. When I suggested this dessert, the hostess said that although she didn´t have a torch, she did have an iron burner which she was confident could be used for caramelising the surface… All I can say is, whatever you do, do NOT attempt this dish if you don´t have a blow torch. Failing that, forget the sugar and serve it in individual pots. I did neither which resulted in a technical fault in the middle of service, but the hostess was very gracious about it. Now I know.
So, if you are tempted to do some professional catering, the moral of the story is… make things easy for yourself, choose dishes that could be done in advance, at least in part (especially if you are feeding a large number of people), dishes that can be finished off quickly, and, most important of all, expect the unexpected, be a problem-solver and be prepared to improvise because more often than not, some things will just not turn out the way you thought.
Scallops and endives with orange sauce – adapted from a recipe by Narda Lepes
Ingredients
Bacon, cut into a very small brunoise, 100 g
Scallops 200 g
Endives, 4
Butter, as needed
Sea salt, as needed
Orange, as needed
Lemon, as needed
Coriander flowers, to garnish (I used edible Monks cress flowers, fresh from
the garden)
How to make:
Fry the bacon in its own fat. Set aside and in the same pan seal the scallops. Do NOT touch them too much. For best results, turn them over with a pair of small tongues. Failing that, tumble them over with your index finger. They cook extremely fast, just a couple of minutes each side. If you overcook them, they become rubbery so you really need to watch what you´re doing.
At the same time, in a big, flat pan sautee the endives, previously cut into long strips (into quarters really) in butter. Add the sea salt and the orange juice (if you use freshly-squeezed orange juice it will taste divine). Let it reduce a bit.
To serve: Put some endives on the plate, scatter some bacon cubes and place about 5 scallops on top. Garnish with the edible flowers and drizzle with some of the orange sauce. You can also add a lemon wedge and some orange peel cut into strips.
Mirin-glazed salmon (adapted from Nigella Express)
Ingredients
- 60ml mirin (Japanese sweet rice wine)
- 50g light brown sugar
- 60ml soy sauce
- 4 x 125g pieces salmon, cut from the thick part of the fillet so that they are narrow but tall rather than wide and flat
- 2 x 15ml tablespoons rice vinegar
- 1-2 spring onions, halved and shredded into fine strips
Method
Serves: 4
1. Mix the mirin, brown sugar and soy sauce in a shallow dish that will take all 4 pieces of salmon, and marinate the salmon in it for 3 minutes on the first side and 2 minutes on the second. Meanwhile heat a large non-stick frying pan on the hob.
2. Cook the salmon in the hot, dry pan for 2 minutes and then turn the salmon over, add the marinade and cook for another 2 minutes.
3. Remove the salmon to whatever plate you’re serving it on, add the rice vinegar to the hot pan, and warm through.
4. Pour the dark, sweet, salty glaze over the salmon and top with the spring onion strips.
5. Serve with rice or noodles as you wish, and consider putting some sushi ginger on the table, too.
For the sushi rice
Gohan – © Gabriela R.
Wash 1 kg of sushi rice 3 or 4 times, then rinse for approximately 30 more minutes. Place the rice in a big pan and cover with 1000 cc water. Cook until it boils, WITHOUT stirring, lower the heat to its lowest setting, cover the pan and leave it like that until the rice has absorbed all the water (about 20 minutes). Do NOT lift the lid of the pan during cooking. Turn the heat off and leave to rest, covered, 10 more minutes.
For the sushi vinegar :
Heat 150cc sushi vinegar, 1 tsp. salt and 150g sugar in a pan. Stir until everything is combined and the sugar has dissolved. Leave to cool.
Place the warm sushi rice in a plastic or wooden bowl. Add the sushi vinegar and stir it in, making sure all the rice has some vinegar. Keep warm.
Note : If you are using this rice for sushi, leave it to cool completely. Spread it out on a flat surface if you are in a hurry. That way, it will cool down quicker.
Crème brûlée
- 600ml double cream
- 1 vanilla pod
- 8 egg yolks
- 3 tablespoons caster sugar
- Approx.6 tablespoons demerara sugar
Method
Serves: 6-8
1. Put a pie dish of about 20cm diameter in the freezer for at least 20 minutes. Half-fill the sink with cold water. This is just a precaution in case the custard looks as if it’s about to split, in which case you should plunge the pan into the water and whisk the custard. I’m not saying it will – with so many egg yolks in the rich cream, it thickens quickly and easily enough – but I always feel better if I’ve done this.
2. Put the cream and vanilla pod into a saucepan and bring to boiling point, but do not let boil. Beat the eggs and caster sugar together in a bowl, and, still beating, pour the flavoured cream over it, pod and all. Rinse and dry the pan and pour the custard mix back in. Cook over medium heat (or low, if you’re scared) until the custard thickens: about 10 minutes should do it. You do want this to be a good, voluptuous crème, so don’t err on the side of runny caution. Remember, you’ve got your sinkful of cold water to plunge the pan into should it really look as if it’s about to split.
3. When the cream’s thick enough, take out the vanilla pod, retrieve the pie dish and pour this crème into the severely chilled container. Leave to cool, then put in the fridge till truly cold. Sprinkle with demerara sugar, spoonful by spoonful, and burn with a blowtorch till you have a blistered tortoiseshell covering on top.
4. Put back in the fridge if you want, but remember to take it out a good 20 minutes before serving. At which stage, put the bowl on the table and, with a large spoon and unchecked greed, crack through the sugary carapace and delve into the satin-velvet, vanilla-speckled cream beneath. No more talking: just eat.


